Objective
This document aims to describe the flow of ARTWORK request submission on SIMPhony Artwork Main Application by Customer Service / Technical Consultant (TC) team. This document applies to Mobile Operators, BDA & CI Business Units at IDEMIA.
Artwork Main system is an online interface which provides Customer Service/TC team and TEC team to maintain transparency in the Artwork creation process.
The manual’s instructions are combined with Artwork Main system images to make the user familiar with system interfaces as well as the workflow. The screens are self- explanatory to guide the user while using the system.
This user guide provides solutions to create new Artwork requests, view the status of already requested Artwork(s).
Note: All data displayed within each screen shot of the manual is for display purpose only and does not reflect any real customer data. Screen shots are just for reference, they may get changed during development.
AUDIENCE
Customer Services / Technical Consultants (TC) TEC Team
HISTORY
Document Creation Date: 20/08/2025
| Action | Name/Position | Date |
|---|---|---|
| Created By | Avanish Tewari | 22 August 2025 |
| Approved By | Devendra Tayal | 22 August 2025 |
| Date | Insert Version | Update/Description | Approved By |
|---|---|---|---|
| 30-11-2020 | 0.1 | First Release of the Document | Vipul Garg |
| 22-08-2025 | 0.2 | With Updated Features of Artwork Main | Devendra Tayal |
INTRODUCTION
The Artwork Main System is an application which facilitates the CS/TC and TEC team to ease the process of artwork request till its delivery. The Artwork Main System is designed to be used by both CS/TC and TEC team. The functionalities of both the roles are interdependent on each other.
CS/ TC Team can perform the following operations:
- Creating Request
- Resubmit Review Non-Ok Request
- Validating DAD
- Validate Optional Input
- Raising Change Request
- Approving Redelivery Request
TEC Team can perform the following operations:
- Reviewing Request
- Creating DAD
- Delivering Artwork
- Approving Change Request
- Delivery Optional Input
- Raising Redeliver Request
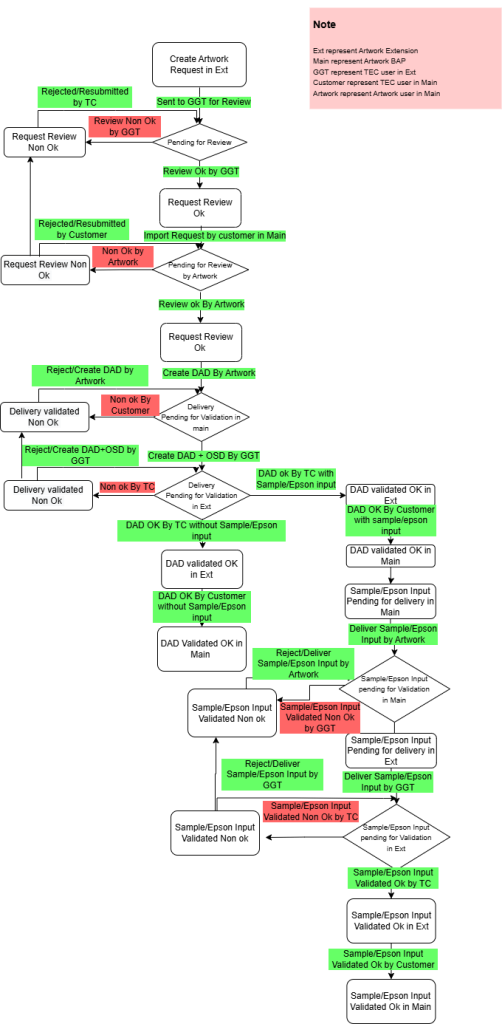
Flow Chart
Workflow of Artwork System
Navigations
 TC must login to SIMPhony using his/her credentials. For creation of Artwork Request, he must click on “Artwork Portal Main” Module.
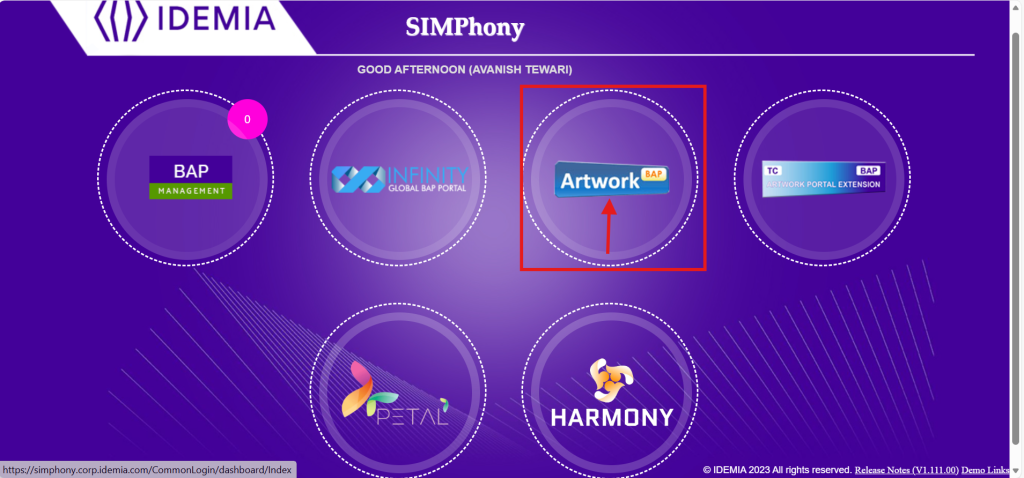
On Successful Login as TC, the below Dashboard screen appears when clicked on the Home Button.
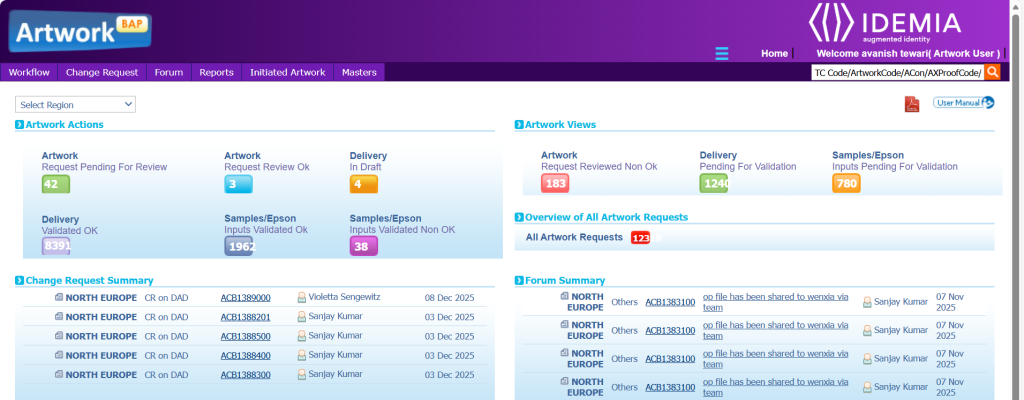
System Interfaces which provide user to view, add and update data in the system. This part is highlighted in a figure TEC Dashboard with green color.
- Workflow
- Customer Actions
- Customer Views
- Change Request
- List
- History
- Discarded Artworks
- Update AX Proof Code
- Forum
- List
- Reports
- Artwork Overview
- Artwork Summary
- Hold/Un-Hold Logs
Note: Detailed description of these navigations has been provided in this document in next chapters
System Data: A quick view of the system of recent activity, also a view some historical data. This part is highlighted in a figure TEC Dashboard with red color.
- Customer Actions
- Customer Views
- Overview of All Artwork Requests
- Change Request Summary
- Forum Summary
Customer Actions
This portion contains a count of records whose development is with TEC, to view all records the user need to click on the count he will be redirected to the List of records lying under selected request status.

TEC Actions
Customer Views
This portion contains a count of records whose development is in BAP Center side, to view all records user need to click on the count he will be redirected to the List of record lying under selected request status.

 TEC Views
Overview of all Artwork Requests
This option allows the artwork user to view the current status of all Artwork requests. 

Change Request Summary This portion contains a list of 5 recent change request raised in the system. To view more details about change request, click title, and to view details about request user need to select Request Code and then he will have full view of the Artwork Request.

 Change Request Summary (TEC)
Forum Summary
This portion contains Discussion / Forum (5 Recent Discussions) which are posted in the system. To view all forum, use forum navigation.

Forum Summary (TEC)
Create New Requests

- High Priority > This checkbox is optional. If checked, then for one customer only 5 request can be created on the same day
- Business Unit > This field is mandatory and must be selected with the available options in the dropdown.
- Customer > Select customer from this dropdown.
- Region > Region will be auto populated in this dropdown to which above customer is linked.
- Country > Country will be auto populated in this dropdown to which above customer is linked.
- Save & Send > Post filing all info on request type page, click on Save & Send> Info will be saved, Request will be provided to Artwork Team to work on the same.
| Field | Description |
|---|---|
| Customer Details | |
| Select | From the Select button, Select the XML file. |
| Import XML | From the Import XML button fetched data from XML file selected and populated in the request form. |
| Business Unit | From the dropdown list, select name of the business unit. |
| High Priority | Select the High Priority checkbox for priority of request. |
| Region | From the dropdown list, select name of the region. |
| Country | From the dropdown list, select name of the country. The list is displayed on the basis of the selected region. |
| Customer | From the dropdown list, select the name of the customer. The list is displayed on the basis of region and country selected. |
| BAT Center | From the dropdown list, select name of the BAT Center. |
| Card Body Printing Center | From the dropdown list, Card Body Printing Center selected according to BAT Center. |
| New AX Proof Code | Type in the New AX Proof Code for artwork request. |
| Ref AX Proof Code | From the dropdown list, Ref AX Proof Code is available after artwork request is validated Ok. |
| Ref ACON No | From the dropdown list, Ref ACON No is available after artwork request is reviewed Ok. |
| Artwork Name | Type in the name of the artwork you want to imprint on the card. Note: Only alphanumeric characters are allowed as artwork name. |
| Card Body Details | |
| Plug Type | From the dropdown list, select one of the following plugs required for the card: · 2FF · 3FF · SIMfit · Re-plug · 4FF |
| Surface Finish(Front) | From the dropdown list, select one of the following options: · Gloss · Matt · High Gloss/Mirror · Non Varnish |
| Type of Card | From the dropdown list, select one of the following options: – ID – Half – Quarter – 4 in one |
| Surface Finish (Back) | From the dropdown list, select one of the following options: · Gloss · Matt · High Gloss/Mirror · Non Varnish |
| Material Structure | From the dropdown list, select one of the following options: · ABS · ABS + PVC · PVC’s · ABS+PVC-7M |
| Special Requirement | From the dropdown list, select one of the special Requirement. |
| Module Type | From the dropdown list, select one of the following options: · 6 Contact · 8 Contact · NA |
| Delivery Details | |
| Source Files | Type in the name of source files which need to be used for creating artwork |
| SAD Required | Select the radio button Yes or No to indicate whether SAD is required. |
| Op Spec | Type in the name of Op Spec. Note: This field is mandatory in case “SAD Required” is selected as Yes. |
| Scratch Label Required | Select the radio button Yes or No to indicate whether Scratch Label is required. |
| Existing | From the dropdown list, select whether existing Scratch Label is required. If new scratch label is required, then type the name in the adjacent field. Note: This field is mandatory in case “Scratch Label Required” is selected as Yes. |
| Other Details | |
| Color Reference | From the dropdown list, select one of the following options. · EPSON PROOF · CUSTOMER REF SAMPLE · EXISTING REF SAMPLE · PANTONE · OTHERS |
| EXISTING REF SAMPLE | From the dropdown list, select the Existing Ref Sample of reference. |
| PANTONE | From the dropdown list, select the Pantone of reference. |
| Remarks | Type in remarks. |
DAD Validation / Samples/Epson Inputs Request in Artwork
The creation of DAD leads to a validation stage where the feedback is given to the Artwork team by TEC. During validation TEC can also raise a request for Samples/Epson Inputs of type Samples and MAF. If there is no requirement of sample or MAF then the TEC can select the “None” option and close the request. The customer requests for sample artwork creation once the DAD is validated.

DAD (Digitally approved document) Validation 

- Review the DAD and provide the Delivery Feedback by selecting one of the following options:
– OK – To approve the DAD and forward it to the Artwork team for next action.
– Non-OK – To disapprove the DAD and send back to the Artwork team.

Note: Select “None” from Samples/Epson Inputs required dropdown list if Samples/Epson Inputs are not required, request status will be marked as validated Ok.
Samples/Epson Input Request If a customer asks for sample or MAF then TEC can raise optional input request also TEC user can raise a request for reference or for validation depending on the scenario.
Note:* “Samples/Epson Input request” is optional cycle

Samples/Epson Input Request Elements Details
| Optional Input Required | Select Optional Input Required as: – Sample Required – MAF Required – None |
| For | Optional Input Required for as: – Validation – Reference |
| No. Sample/MAF Card Required | Enter no. of card required |
| Sample Type | Select Sample type from: – Plugin punch – Printed with Printed Sample – Printed with Dummy Chip – Printed with Optical Value – Printed with Scratch label Note: This input will only be visible if Sample Epson Input Required is selected as “Sample Type“. |
Optional Input Request and Request Status Details
| Sample Requires for Reference | Request is considered to be closed. No validation needed from TEC team. |
| Sample Requires for Validation | Request is considered to be closed. TEC team need to validate optional input delivery samples. |
| MAF for Reference | Request is considered to be closed. No validation is needed from TEC team. |
| MAF for Validation | Request is considered to be closed. TEC team need to validate optional input Delivery samples. |
| None | Request is closed. |
Step 6. Click Save and Send button to send request to the Artwork team.
TEC Views
- The TEC can view requests on which Artwork team has to take action or the requests which are lying under closed status.
Request Pending for Review


DAD Views After creating the request, the CS/TC team can view the details of DAD and OSD files through Artwork Request Full View screen. To view the DAD and SAD files, perform:
Step 1. On the homepage, click Workflow >> Delivery Pending for Validation to display list of requests.


Samples/Epson Inputs Pending for Delivery
The Samples/Epson Inputs pending for delivery can be viewed by artwork as and when required. This helps the artwork to track the progress of their artwork request. Perform the following steps to view optional input delivery:

DAD Validated Non-Ok All the Non-Validated DADs can be viewed by the Customer (CS/TC) as and when required. Perform the following steps to view non-validated deliveries:
Step 1. On the homepage, click Workflow >> Delivery Validated Non-Ok to display the list of requests.

Samples/Epson Inputs Validated Non-Ok
The Samples/Epson Inputs validated Non-Ok can be viewed by Customer (CS/TC) as and when required. This helps the customer to view the progress of optional input delivery of artwork request.
Step 1. On the homepage, click Workflow >> Samples/Epson Inputs Validated Non Ok to display the list of requests.

DAD Creation


Change Request
Raising Change Request
The CS/TC can raise change request to the TEC team before the request validation. The TEC team can accept or reject depending on the stage of the request. If the request is accepted then the TEC team reworks on the request and deliver it again. Perform the following steps to raise a change request:
Step 1. On the homepage, click Workflow and select the option from CS/TC Views section. The CS/TC can raise change request only when the request is at one of the following stages:
- Artwork Request Pending For Review
- Artwork request Review Ok
- Delivery Validated Non-ok


| Category | Select one of the following options: – CR on Both: To raise a change in the selected request for DAD and OSD. – CR on DAD: To raise a change in the selected request for DAD. – CR on OSD: To raise a change in the selected request for OSD. |
| Root Cause | Choose root cause from the drop down |
| CR Responsibility | Choose who will be responsible for CR |
| Upload File | Upload supporting file. |
| Preventive Action | Type in the preventive action for this CR |
| Description | Type in description of this CR |
Step 4. Click the Change Request/Discard Request button to send request to the Artwork team.
Note: This Change Request/Discard Request button interchange on the basis of selected category.
CR on Both: Version of Both DAD and OSD will be incremented.
CR on DAD: Version of DAD will be incremented.
CR on SAD: Version of OSD will be incremented.
Approving/Rejecting Change Request
The Change request raised by CS/TC must be approved by the TEC team. Once it gets the approval then only rework is initiated. The TEC team can also reject the request if the request is not feasible to design. Perform the below mentioned steps to approve the change request:
Step 1. On the homepage, click Change Request* >> List to display the list of change requests.


Adding Forum
The Artwork Main System is an application which facilitates the CS/TC and TEC team to ease the communication by providing forum support. Both TEC and TEC Team can raise form at any stage after request send band before validation of request.
Step 1. On the homepage, click Forum >> List to display the list of requests.

Step 2. Forum full view, click Forum >> Forum View to display full details of forum.

Click on + add reply button to add reply.

