Introduction
Definition
Database recovery refers to the process of restoring a database to a correct and consistent state after a failure or corruption. It involves recovering data from backups or using transaction logs to undo and redo changes made to the database.
Scope
The scope of a database recovery process encompasses all actions required to restore a database to a consistent state after a failure or error. This includes identifying the extent of the failure, determining the recovery options, and executing the recovery procedures. The recovery process can involve using backups, transaction logs, and other recovery techniques to bring the database back to a functional state
Following Databases comes under the scope of this process
- SIMPra Production Database server
- IP Address: 10.132.197.66
- Host Name: INNOSIMDB1V0002
- Operating System: Windows Server 2019 Datacenter
- Database Version: SQL Server 2019 Standard Edition
- Patch details: (CU19) (KB5023049) – 15.0.4298.1 (X64)
- SMTP server used: smtprelay1.corp.idemia.com , port: 25
- SIMPra Test Database server
- IP Address: 10.132.129.94
- Host Name: INNOSIDBT1V0001
- Operating System: Windows Server 2019 Standard
- Database Version: SQL Server 2019 Standard Edition
- Patch details: 15.0.2000.5 (X64)
- SMTP server used: smtprelay1.corp.idemia.com , port: 25
Conventions
Database recovery processes involve techniques like backup and restore, transaction logging, and checkpointing to ensure data consistency and integrity after failures or errors. These processes are crucial for maintaining data reliability and availability, allowing for quick recovery and minimal data loss.
The key words “must”, “must not”, “required”, “shall”, “shall not”, “should”, “should not”, recommended”, “may”, and “optional” in this document are to be interpreted as described in RFC2119.”
SIMPra Databases Super Admin (SA) account storage
Create your individual account having all needed privileges in all databases.
Secure SA password for all databases in a sealed envelope. Half of the password will be entered by Saurabh and half by Vinay. So if required, it can be used with the presence of both of us. Purpose of storing SA password in a sealed envelope is to extract in case of emergency and when both of us are not approachable.
Storing admin passwords in a sealed envelope is a method to secure them, often used as a “break-glass” or emergency access solution. The password is placed in a sealed envelope, which is then stored securely, such as in a safe or vault. This ensures that only designated personnel can access the password in specific situations, like when the primary admin account is unavailable.
Here’s a more detailed explanation:
Purpose:
The primary goal is to have a readily available password for emergency situations when the primary admin account is compromised, lost, or inaccessible.
How it works:
A sealed envelope containing the SA admin password is stored in a secure location.
Access Control:
Access to the envelope is restricted to BA (Shiv Shukla) , Technology Leads (Amit , Sandeep and Neeraj).
SIMPra production database Disaster recovery Environment Setup
Setup 1 : HADR (High Availability Disaster Recovery) using SQL Server Always On
Purpose
We are using SQL Server’s in-built Always On feature.
We are using SQ Server basic Availability Groups to provide high availability and disaster recovery for our database. The solution keeps a synchronous or asynchronous copy of the database on a secondary instance; if the primary server fails, we can automatically (or manually) promote the replica, ensuring service continuity.
Operating Mode
We are using Synchronous mode for the minimum data loss. However the target database will not be available for querying as we are using SQL Server standard Edition.
There will be minimum data loss in case of an incident.
Servers involved:
| Purpose | Environment | IP | Host Name | DB Version |
| DB Server | Production | 10.132.197.66 | INNOSIMDB1V0002 | MS SQL Server 2019 Standard Edition |
| DB Server | Production Secondary | 10.132.197.67 | INNOSIMDB1V0003 | MS SQL Server 2019 Standard Edition |
Both servers are part of Windows clustering setup.
Windows Cluster: SIMPRADBCLUSTER.corp.idemia.com

SQL Server Availability Group
We have an AG created for the above cluster.
Availability Group Name: SIMPRA_AG
Failover Mode: Manual. In case of an incident, we will have to manually activate the secondary database Server
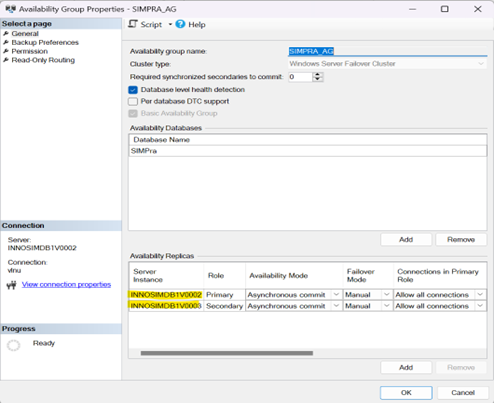
Availability Group Monitoring in SQL Server on primary Production Server

Setup 2 : Database Replication using Log Shipping
Purpose
SQL Server log shipping is a technique which involves two or more SQL Server instances and copying of a transaction log file from one SQL Server instance to another. The process of transferring the transaction log files and restoring is automated across the SQL Servers. As the process result there are two copies of the data on two separate locations
Operating Mode
We are using Restore mode – i.e. the target database where Log shipping is being done is not accessible for querying.
Frequency: 15 Minutes
There will be data loss of 15 minutes in case of an incident.
Note: With Log Shipping, however, there is no Listener support: the secondary server stays offline (in stand-by or restoring mode) until roles are switched manually. Therefore, after a failover you must update the application’s connection string—or change a DNS alias—because a virtual address does not automatically follow the active server.
Servers involved:
| Purpose | Environment | IP | Host Name | DB Version |
| DB Server | Production | 10.132.197.66 | INNOSIMDB1V0002 | MS SQL Server 2019 Standard Edition |
| DB Server | UAT | 10.132.129.194 | INNOSIDBT1V0001 | MS SQL Server 2019 Standard Edition |
Log Shipping works on three steps:
Step 1 : Job to take Production Database Backup
- Configured on 10.132.197.66- Production Primary Server
- Job name :LSBackup_SIMPra

- Backup Folder: \\ INNOSIMDB1V0002\E:\backup shared folder

- Database Name: SIMPra
Step 2 : Job to Copy T-Log Backups from Production Primary Server to UAT Server (configured on 10.132.196.61)
- Configured on 10.132.129.194 (UAT Server)
- Job name :LSCopy_INNOSIMDB1V0002_SIMPra

- Copy Folder : \\INNOSIDBTV0001\D:\backup shared folder

Step 3:Job to restore the copied T-log backups to the secondary DB i.e. SIMPraLS
h. Configured on 10.132.129.194 (UAT Server)
i. Job name: LSRestore_INNOSIMDB1V0002_SIMPra

j. Database name: SIMPraLS
Monitoring requirements to cover limitations coming with this configuration
In case of failure of UAT server (10.132.129.194) as we are not expecting the UAT server will be providing 100% availability.
IT team will be informing the DBA before having such UAT downtime, DBA will be disabling these 3 Log Shipping jobs and will enable them post downtime.
Setup 3 : Database Files Replication
Below is the backup schedule of database server drives:
- 10.132.197.66 – Its on Replication and replicate in every 10 Minutes
- We have a daily evening backup also at 11PM.
- We are taking the drives backup to Backup server HDD ( Repository )
- We are taking the monthly drives backup to Tape drive.

Setup 4 : Database Backups
We have our backup strategies for the SIMPra DB over PRIMARY DB server i.e. 10.132.197.66.
We are carrying FULL,differential and t-log backups.
- FULL backup:
Job: DBA_Maintenance_DatabaseBackup – USER_DATABASES – FULL
Job frequency: Daily at 6 AM
This job takes the FULL backup daily at 6 AM at the below location over 10.132.196.67 server:
F:\Microsoft SQL Server\Backup\SIMPRADBCLUSTER$SIMPRA_AG\SIMPra\FULL

Job History:

- Diiferential backup:
Job: SIMPra-DIFF-backup
Job frequency: Every 3 hours
This job takes the differential backup every 3 hours at the below location over 10.132.196.67 server:
F:\Microsoft SQL Server\Backup\SIMPRADBCLUSTER$SIMPRA_AG\SIMPra\DIFF

- LOG backup :
Job: LSBackup_SIMPra
Job frequency: Every 15 mins
This job takes the log backup 15 mins at the below location over 10.132.196.67 server:
E:\backup shared folder\

Job History:

List of Database backup Copies
FULL backup files:

Diff backup files:

T-log backup files:

BackUp Frequency
FULL backup: Everyday at 6 AM

DIFF backup: Every 3 hours

T-log backup: Every 15 minutes

AG IMPLEMENTATION Specifications
Creating a Windows Failover Cluster (WFC) and Availability Group (AG) in SQL Server
Prerequisites
- Two or more Windows Server nodes joined the same Active Directory domain.
- SQL Server Standard/Enterprise Edition installed and configured on all nodes.
- Shared storage is not required for AG.
- At least one instance installed on each node with same SQL Server version and CU
- Windows Failover Clustering feature installed on all nodes.
Part 1: Create the Windows Failover Cluster (WFC) Responsible Team: IT Team INDIA
Step 1: Install the Failover Clustering Feature
Install it on 10.132.196.67 and 10.132.196.68 via Server Manager.

Step 2: Create the Cluster
Open Failover Cluster Manager:

Click on Create Cluster–>Select INNOSIMDB1V0002 and INNOSIMDB1V0003–>Then you need to specify the cluster name (eg. SIMPRADBCLUSTER.corp.idemia.com).This completes the cluster creation. The figure below shows the final screen indicating the cluster creation was successful.

We have to specify the Static IP address as suggested by IT team.
AND
Please note there is no need to create shared disks as our case is AG.
Step 4: Verify the Cluster
- Open Failover Cluster Manager.
- Check cluster name, nodes, and networks.
Part 2: Configure Always On Availability Group (AG) Responsible Team: INDIA DBA
Step 1: Enable Always On in SQL Server Configuration Manager
- Open SQL Server Configuration Manager.
- Go to SQL Server Services > Properties > Enable Always On Availability Groups.

- Restart SQL Server service.
Step 2: Create or pick a Database for the AG
- Ensure the database is in FULL recovery model.
- Take a full and log backup.
Step 3: Create AG from SSMS (GUI Method)
- Right-click “Always On High Availability” > “New Availability Group Wizard”.
- Provide AG Name:

- Select database(s).

- Add replica servers.

- Configure automatic failover (if needed).
- Specify backup preferences.
- Select data synchronization method
Asynchronous-commit mode: In this mode, Primary replica sends the transaction log blocks to a secondary replica, but it does not wait for the acknowledgement for transaction commit. Recommended for production environments where nodes are in different networks or locations, when small losses are acceptable, systems that are extremely sensitive to delays in data recording.
Synchronous-commit mode: In synchronous-commit mode, the primary replica waits for the transaction commit from a secondary replica. Once it receives the confirmation, SQL Server confirms to the client. Recommended for production environments where data loss must be zero.
Step 4: Validate the AG
- Monitor using SSMS AG dashboard

LOG SHIPPING IMPLEMENTATION Specifications
Setting Up SQL Server Log Shipping
Prerequisites
- SQL Server Standard/Enterprise Edition on both servers.
- Both servers must be accessible over the network.
- Shared folder accessible by both servers.
- SQL Server Agent must be running on both servers.
Step 1: Configure Log Shipping (Primary Server)
- In SQL Server Management Studio (SSMS), right-click on the primary database > Tasks > Ship Transaction Logs.
- Enable this as a primary database in a log shipping configuration.
Configure Backup Settings:
- Set the shared folder path (e.g. \\PrimaryServer\LogShipFolder).

- Set backup retention and frequency.
- Configure SQL Server Agent schedule.
Step 2: Add Secondary Server
- In the same wizard, click Add under secondary server.
- Connect to the secondary instance.

Initialize Secondary Database from any of the three options.
Step 3: Configure Copy Job
- Set the copy destination folder (e.g. \\SecondaryServer\LogShipFolder).

- Configure retention and schedule.
Step 4: Configure Restore Job
- Choose NORECOVERY or STANDBY mode.

- Configure delay (optional) and restore frequency.
Notes
- Use sp_help_log_shipping_monitor to monitor status.
- Keep an eye on:
- Last backup time
- Last copy time
- Last restore time
DATBASE RECOVERY FROM Availability Group
We will be utilizing synchronized SIMPra DB over secondary PROD server.
Step 1: Open SSMS over the node INNOSIMDB1V0002 .
Step 2: We will be doing the manual failover which will change the primary node of our ‘SIMPra AG’ from INNOSIMDB1V0002—-> INNOSIMDB1V0003.

Step 3: Now our AG is running primarly over INNOSIMDB1V0003.
Step 4: Take RDP to INNOSIMDB1V0003.
Step 5: Connect SSMS.
Step 6: Run ‘select’ query over any of the latest updated table of SIMPra DB, it must provide the correct/expected result.
Database Recovery from Log Shipping
We can utilize our Log Shipping configuration to recover our SIMPra database
Step1: Disable the Backup job over the SIMPra PROD server ( 10.132.196.67 ). Un-check the ‘enabled’ button.

Step 2: Disable the Copy job over the SIMPra UATserver ( 10.132.196.61 ). Un-check the ‘enabled’ button.

Step 3: Disable the Restore job over the SIMPra UATserver (10.132.196.61 ). Un-check the ‘enabled’ button.

Step 4:
- Connect 10.132.196.61 via SSMS.
- Connect master DB.
- Run below script:
RESTORE DATABASE SIMPra WITH RECOVERY;
It will recover SIMPra DB,the lag time from the PROD SIMPra DB will be the time post the last restore backup done ( maximum 15 mins ).
Database recovery Steps from File System
As SIMPra PROD server 10.132.196.67 drives backups are replicated every 10mins and monthly.
There are two ways from where we can get back our drives data:
1st method: We will be utilizing backups from the Backup server HDD (repository) to recover in case of any failure.
2nd Method: Monthly backups are taken to Tape drive, it can be utilized too.
Database Recovery by restoring from Backup
We will be utilizing these FULL/T-log backups to recover of SIMPra DB over 10.132.196.67 server in the case of disaster/failures.
We will carry out our restoration process in the following ways:
SSMS GUI
- Right click Databases->Select Restore Database post connecting 10.132.196.67.
- Select required backup files from the browse button (latest FULL backup + latest diff backup+ all t-log backup files post last DIFF backup)

- Select Options->WITH REPLACE->Recovery state as WITH RECOVERY->Click OK
T-SQL method:
SIMPRA DB can be restored by running the following T-SQL:
USE [master]
RESTORE DATABASE [SIMPra] FROM DISK = N’F:\Microsoft SQL Server\Backup\SIMPRADBCLUSTER$SIMPRA_AG\SIMPra\FULL\recentFULLbackupfile.bak’ WITH FILE = 1, NORECOVERY, NOUNLOAD, STATS = 5,
—MOVE command if required
RESTORE DATABASE [SIMPra] FROM DISK = N’F:\Microsoft SQL Server\Backup\SIMPRADBCLUSTER$SIMPRA_AG\SIMPra\FULL\recentDIFFbackupfile.bak’ WITH FILE = 1, NORECOVERY, NOUNLOAD, STATS = 5
RESTORE LOG [SIMPra] FROM DISK = N’D:\backup shared folder\firstlogile.trn’ WITH FILE = 1, NORECOVERY, NOUNLOAD, STATS = 5 —-first_LOG_backupfile_post_DIFF_backup
.
.
.
RESTORE LOG [SIMPra] FROM DISK = N’D:\backup shared folder\lastlogfile.trn’ WITH FILE = 1, RECOVERY, NOUNLOAD, STATS = 5 —last_LOG_backupfile_post_DIFF_backup
GO
Use ‘WITH MOVE’ in case of the change in directory for SIMPra DB files.